Yodiz Grab - Chrome Browser Extension
Chrome browser extension is simple and quick way to capture screenshot of any webpage, annotate with comments, highlight important areas and create issue or user story from browser add-on, without opening Yodiz app. It is super fast and perfect for QA teams.
- Capture screenshot of any web page
- Annotate, add comments, highlight areas
- Report to Yodiz as Issue or User Story
- Browser and other metadata included automatically
- Fastest and simplest way to engage
- Attach annotated screenshots to existing issue or user story

Yodiz Grab - Firefox Addon
Firefox browser addon is simple and quick way to capture screenshot of any webpage, annotate with comments, highlight important areas and create issue or user story from browser add-on, without opening Yodiz app. It is super fast and perfect for QA teams.
- Capture screenshot of any web page
- Annotate, add comments, highlight areas
- Report to Yodiz as Issue or User Story
- Browser and other metadata included automatically
- Fastest and simplest way to engage
- Attach annotated screenshots to existing issue or user story

Yodiz Grab - Safari Browser Extension
Safari browser extension is simple and quick way to capture screenshot of any webpage, annotate with comments, highlight important areas and create issue or user story from browser add-on, without opening Yodiz app. It is super fast and perfect for QA teams.
- Capture screenshot of any web page
- Annotate, add comments, highlight areas
- Report to Yodiz as Issue or User Story/li>
- Browser and other metadata included automatically
- Fastest and simplest way to engage
- Attach annotated screenshots to existing issue or user story

Yodiz for Android
Yodiz Android mobile application enables you to stay connected with your team on the go. It's simple interface let you manage all the basic things that you need to do with optimized interface for small screens.
- Simple and comprehensive design
- Powered with all key Yodiz features
- Prioritize Backlog with drag n drop
- Log effort, update status or change responsible with ease.
- Create, edit or delete any item.
- Easier and faster way to follow whats happening in your project with issues.
- Simplified design to track, update and manage sprint contents.

Yodiz for iPhone
Yodiz iPhone mobile application enables you to stay connected with your team on the go. It's simple interface let you manage all the basic things that you need to do with optimized interface for small screens.
- Simple and comprehensive design
- Powered with all key Yodiz features
- Prioritize Backlog with drag n drop
- Log effort, update status or change responsible with ease.
- Create, edit or delete any item.
- Easier and faster way to follow whats happening in your project with issues.
- Simplified design to track, update and manage sprint contents.

Yodiz for iPad
Yodiz iPad application enables you to stay connected with your team on the go. It's simple interface let you manage all the basic things that you need to do with optimized interface.
- Simple and comprehensive design
- Powered with all key Yodiz features
- Prioritize Backlog with drag n drop
- Log effort, update status or change responsible with ease.
- Create, edit or delete any item.
- Easier and faster way to follow whats happening in your project with issues.
- Simplified design to track, update and manage sprint contents.

How to Integrate Assembla with Yodiz
Yodiz supports WebHook integration with Assembla. It will enable you to:
- * Track code commits by associating them with bugs or tasks. This will help you identifying which files are added, updated or deleted against a particular bug or task.
- * Mark your task or bug resolved just by following a simple convention when writing your comments for commit.
Integration Steps
- Go to your account at Assembla.
- Select Following options Enabled,Code Commits,Git push
- Click on "Admin" link on top.
- Under Tools section Click on "More" Button.
- Under Other section Click on "Add" Webhook Button.
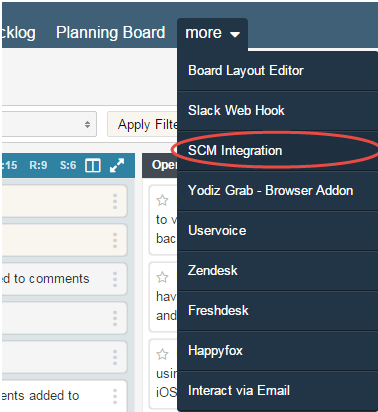
- Login to Yodiz and click on 'SCM Integrations' from "more" navigation menu
- Select Assemmbla from left
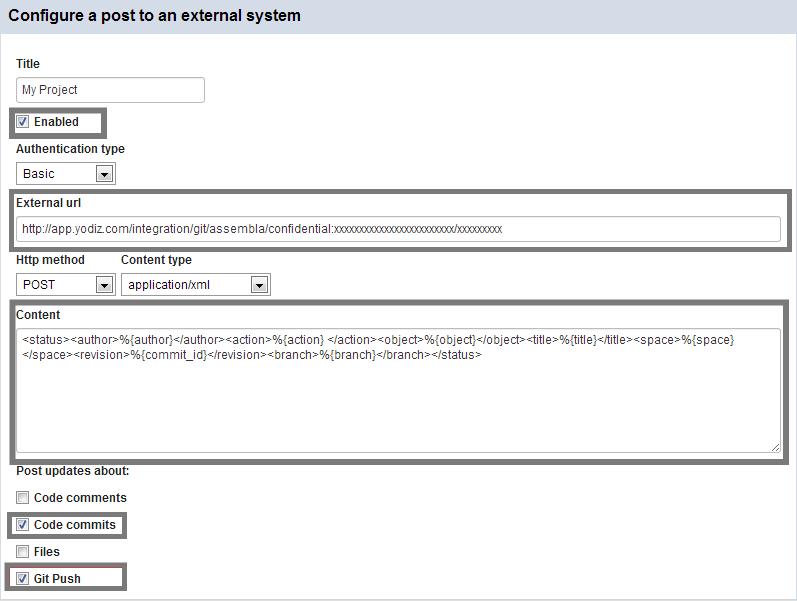
- Copy Unique URL and paste at External url as shown in picture below.
- Copy Request Code and Paste under Content as shown in picture.
- That's it, you are done.
How to Link commits to Tasks and Issues
In your commit message, add following notations to link commits to Tasks and Issues at Yodiz.
- For Tasks: use notation @T25
The commit message will be included in Task with ID 25. - To mark task done, use notation @T25:R
"R" will indicate that this task is completed and Yodiz system will update the task status automatically. - For Issues: use notation @B12
The commit message will be included in Issue with ID 12. - To mark Issue as "resolved", use notation @B12:R
"R" will indicate that this issue is resolved and Yodiz system will update the issue status automatically - If you face any issue, please Contact Support
How to Integrate Atlassian Stash with Yodiz
Integrations for Atlassian Stash can be accessed through the SCM Integrations page.
Integration Steps
- Login to Yodiz
- On the top menu, press More.
- From this menu, select SCM Integration.
- On the next screen, from the left side menu, select Atlassian Stash.
- Copy the unique URL from the Integrations page.
- Go to your account at Stash.
- Click on the repository you want to link to this Yodiz Project.
- From right panel click on "Settings".
- From left menu click "Hooks".
- Enable Post-Receive WebHooks if you did not find that option then you need to download (Post-Receive WebHooks) plugin.
How to Integrate BitBucket with Yodiz
Yodiz supports WebHook integration with BitBucket. It will enable you to:
- * Track code commits by associating them with bugs or tasks. This will help you identifying which files are added, updated or deleted against a particular bug or task.
- * Mark your task or bug resolved just by following a simple convention when writing your comments for commit.
Integration Steps
- Login to Yodiz and click on SCM Integrations from "more" navigation menu
- Select BitBucket from left
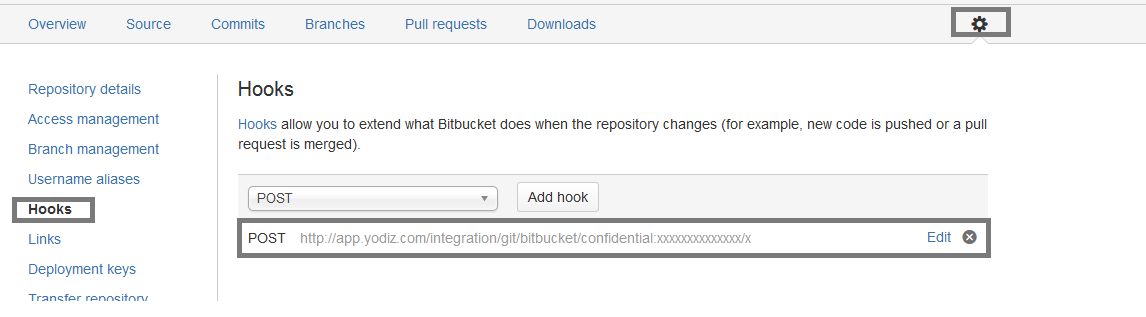
- Go to your account at BitBucket account.
- Select repository setting from top menu.
- From left menu select Hooks.
- Under hooks page select Post from drop down and press add button.
- Copy unique URL and Paste under URL text field and press Save button.
- In your commit message, add following notations to link commits to Tasks, Issues, User Stories and Epic at Yodiz.
- For Tasks: use notation @T25 The commit message will be included in Task ID 25.
To mark Task done, use notation @T25:R “R” indicates that this Task is resolved and Yodiz will update Task status automatically. - For Issues: use notation @B12 The commit message will be included in Issue ID 12.
To mark Issue as “resolved”, use notation @B12:R “R” indicates that this Issue is resolved and Yodiz will update the Issue status automatically. - For User Stories: use notation "@U10:R Commit message" where U denotes User Story, 10 is associated ID and “R” represents resolved (default Status of done category).
- For Epic: use notation @E12:R Commit message" where E denotes Epic, 12 is associated ID and “R” represents resolved (default Status of done category).
- You are done. If you face any issue, please Contact Support
How to Integrate Box with Yodiz
Integrations for Box are inbuilt into Yodiz. Please follow these steps to use them:
- Go into attachments section of any User Story or Issue.

- In order to use Box to upload files into Yodiz, press the Box icon from the window below:

- A popup window will open asking you to sign in to your account.
- Once you are signed in, choose the file you want to upload from the window shown.
- Your file is now attached in User Story or Issue in Yodiz.
How to Integrate Dropbox with Yodiz
Integrations for Dropbox are inbuilt into Yodiz. Please follow these steps to use them:
- Go into attachments section of any User Story or Issue.
- In order to use Dropbox to upload files into Yodiz, press the Dropbox icon from the window below:
- A popup window will open asking you to sign in to your account.
- Once you are signed in, choose the file you want to upload from the window shown.
- Your file is now attached in User Story or Issue in Yodiz.
How to Integrate Freshdesk with Yodiz
Freshdesk integration with Yodiz enables teams to view, plan and manage customer tickets with ease. You can convert Zendesk tickets into Issues or User Stories.
- Login at Yodiz
- Go to "More" from top navigation and select "Freshdesk"
- You will be prompted with form to fill 2 fields that are required for configuring Yodiz integration with Freshdesk
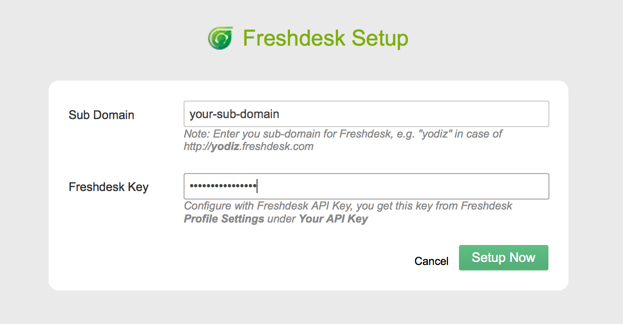
- Sub domain: It is prefix of Freshdesk URL for your company, for example subdomain will be "yodiztest" for Freshdesk URL: https://yodiztest.freshdesk.com
- API Key:You need to get the API key from Freshdesk portal. Please follow these steps.
- Login to Freshdesk account
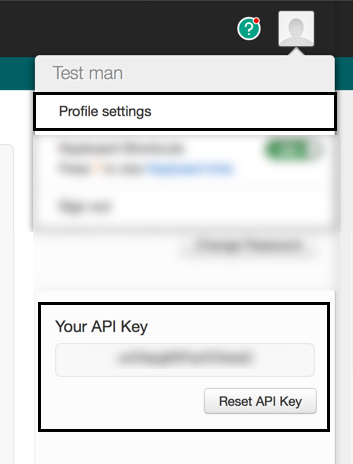
- From top right corner at Freshdesk click on "profile picture"
- Click on "Profile settings"
- On right side panel at bottom you will see "Your API Key"
- Copy API Key
- Go back to Yodiz, use the copied API key and complete setup at Yodiz.
- You are done. If you face any issue, please Contact Support
How to Integrate GIT with Yodiz
Yodiz supports integration wtih Git repositories hosted locally or at any cloud service. If you are using Assembla or GitHub, we recommend to use web hooks based integration.
Integration Steps
- Login to Yodiz and click on 'SCM Integrations' from "more" navigation menu
- Select GIT
- Download hook post-commit-svn
- Copy the downloaded file to git/hooks folder located in your local repository.
- Note: For Linux users please make sure downloaded file "post-commit" is executable.
- That's it, you are done.
How to Link commits to Tasks and Issues
In your commit message, add following notations to link commits to Tasks and Issues at Yodiz.
- For Tasks: use notation @T25
The commit message will be included in Task with ID 25. - To mark task done, use notation @T25:R
"R" will indicate that this task is completed and Yodiz system will update the task status automatically. - For Issues: use notation @B12
The commit message will be included in Issue with ID 12. - To mark Issue as "resolved", use notation @B12:R
"R" will indicate that this issue is resolved and Yodiz system will update the issue status automatically - If you face any issue, please Contact Support
How to Integrate GitHub with Yodiz
Yodiz supports WebHook integration with GitHub. It will enable you to:
- - Track code commits by associating them with bugs or tasks. This will help you identifying which files are added, updated or deleted against a particular bug or task.
- - Mark your task or bug resolved just by following a simple convention when writing your comments for commit.
Integration Steps
- Login to Yodiz and click on SCM Integrations from "more" navigation menu
- Select GitHub from left
- Copy Unique URL
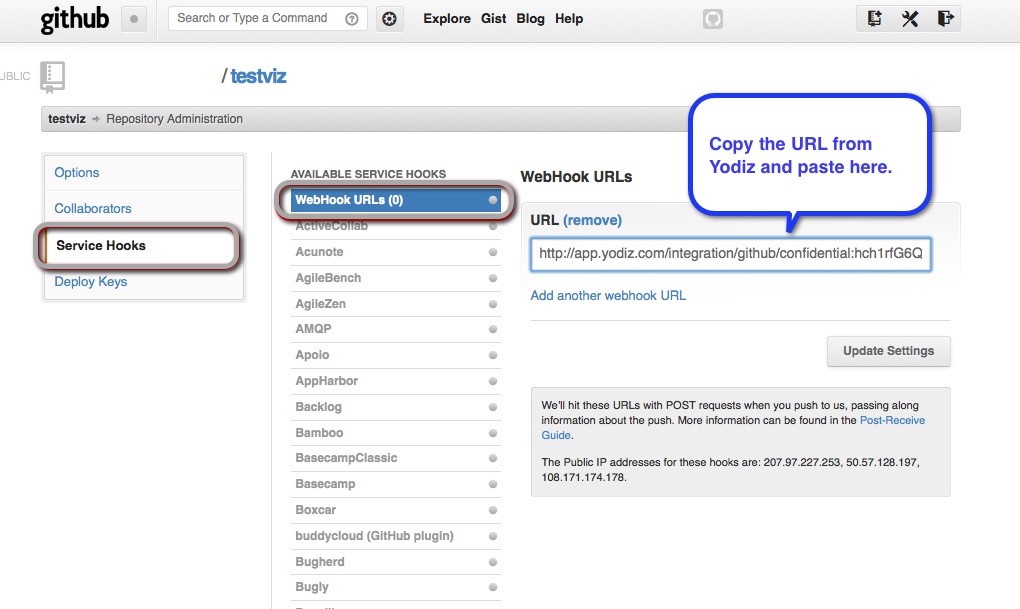
- Go to your account at GitHub
- Click on the GitHub repository you want to link to this Yodiz Project
- From Top right corner, click on "Admin" link
- From left menu click on Service Hooks --> Web Hooks URL
- Paste here the Yodiz URL that you copied at step 1 and press "Update Settings"
- That's it, you are done.
How to Link commits to Tasks and Issues
In your commit message, add following notations to link commits to Tasks and Issues at Yodiz.
- For Tasks: use notation @T25
The commit message will be included in Task with ID 25. - To mark task done, use notation @T25:R
"R" will indicate that this task is completed and Yodiz system will update the task status automatically. - For Issues: use notation @B12
The commit message will be included in Issue with ID 12. - To mark Issue as "resolved", use notation @B12:R
"R" will indicate that this issue is resolved and Yodiz system will update the issue status automatically - If you face any issue, please Contact Support
How to Integrate Google Drive with Yodiz
Integrations for Google Drive are inbuilt into Yodiz. Please follow these steps to use them:
- Go into attachments section of any User Story or Issue.
- In order to use Google Drive to upload files into Yodiz, press the Google Drive icon from the window below:
- A popup window will open asking you to sign in to your account.
- Once you are signed in, choose the file you want to upload from the window shown.
- Your file is now attached in User Story or Issue in Yodiz.
How to Integrate Happyfox with Yodiz
Happyfox integration with Yodiz enables teams to view, plan and manage customer tickets with ease. You can convert Happyfox tickets into Issues or User Stories.
- Login at Yodiz
- Go to "More" from top navigation and select "Happyfox"
- You will be prompted with form to fill 3 fields that are required for configuring Yodiz integration with Zendesk
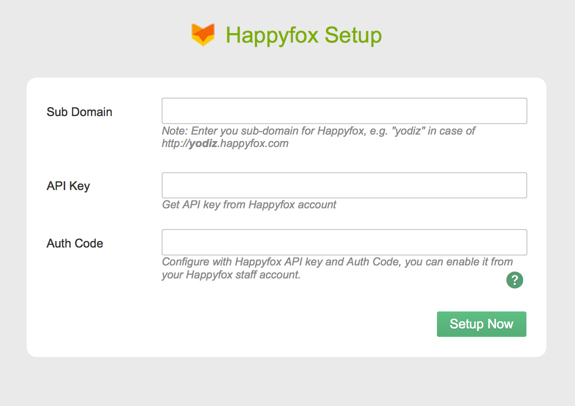
- Sub domain: It is prefix of Happyfox URL for your company, for example subdomain will be "yodiztest" for Happyfox URL: https://yodiztest.happyfox.com
- API Key: API key of your Happyfox account.
- Auth code:You need to get the token from Happyfox portal. Please follow these steps to get API and Auth code
- Login to Happyfox account
- From top menu at Happyfox click on "My Settings"
- Click on "Manage" and then on "Integrations"
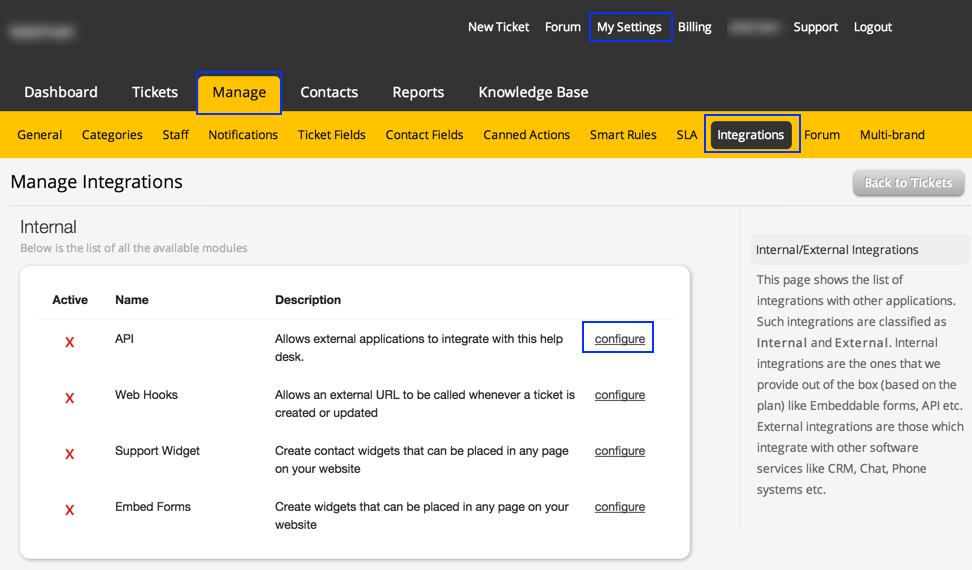
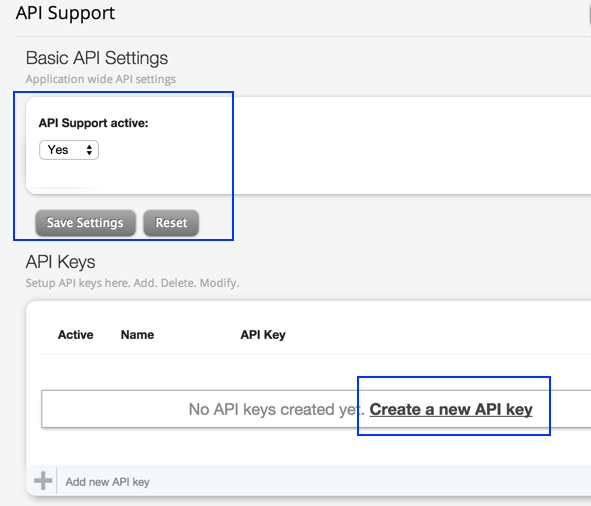
- Click on Configure next to API, if it is not already active.
- Click on "API Support Active", select "Yes" and click on "Save Settings"
- Click on "Create a new API key
- Fill the form values as you prefer and "Save Settings"
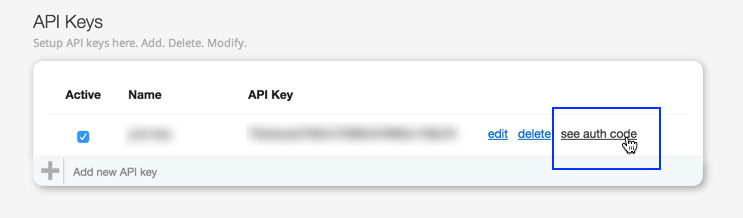
- Once key created, mouse over to API key and click on "See the auth code" link
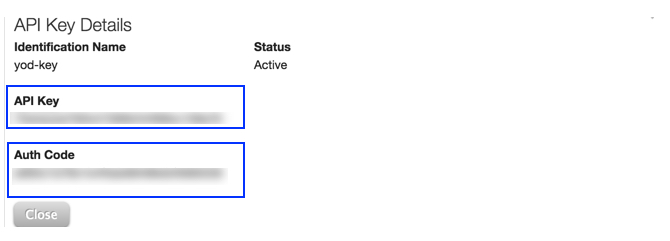
- Copy the API key and Auth Code
- Go back to Yodiz, use the copied API key, Auth code and complete setup at Yodiz.
- You are done. If you face any issue, please Contact Support
How to Integrate Jenkins with Yodiz
Yodiz supports integration with Jenkins. It will enable you to configure events to create issue and assign to specific person, whever build fails.
Integration Steps
- Login to Yodiz and click on SCM Integrations from "more" navigation menu
- Select Jenkins from left
- Download Jenkins plugin by right-click the link, and then click Save Target As.
- Install downloaded plugin, You can do this by navigating to 'Manage Jenkins' -> 'Manage Plugins' option. After successfully plugin installation you will see plugin inputs as given in below screen shots under 'Configure System' page.
- Copy post url and paste in Yodiz Post Plugin as shown below
- From Top right corner, click on "Admin" link

- Copy token and paste in Yodiz Post Plugin as shown below.

- Input your jenkin's project name for which you want to push result logs. For multiple projects input them with '|' separator.

- Input responsible email address. He or she should be part of your project team in yodiz.

- That's it, you are done.
- If you face any issue, please Contact Support
How to Integrate Microsoft Team Foundation with Yodiz
Integrations for Microsoft Team Foundation can be accessed through the SCM Integrations page.
Integration Steps
- Login to Yodiz
- On the top menu, press More.
- From this menu, select SCM Integration.
- On the next screen, from the left side menu, select Microsoft Team Foundation.
- Copy the unique URL from the Integrations page.
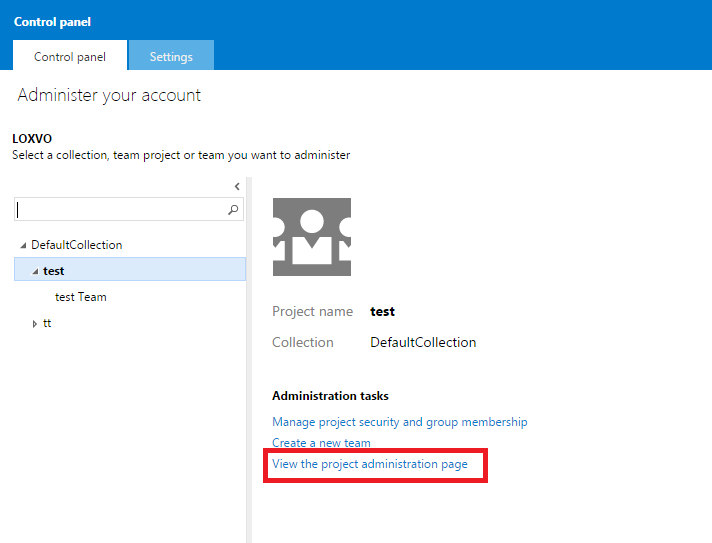
- Go to your account at Visual Studio Online
- Click on the setting from right top corner
- Select code repository from left code browser and launch 'View the project Administration page'
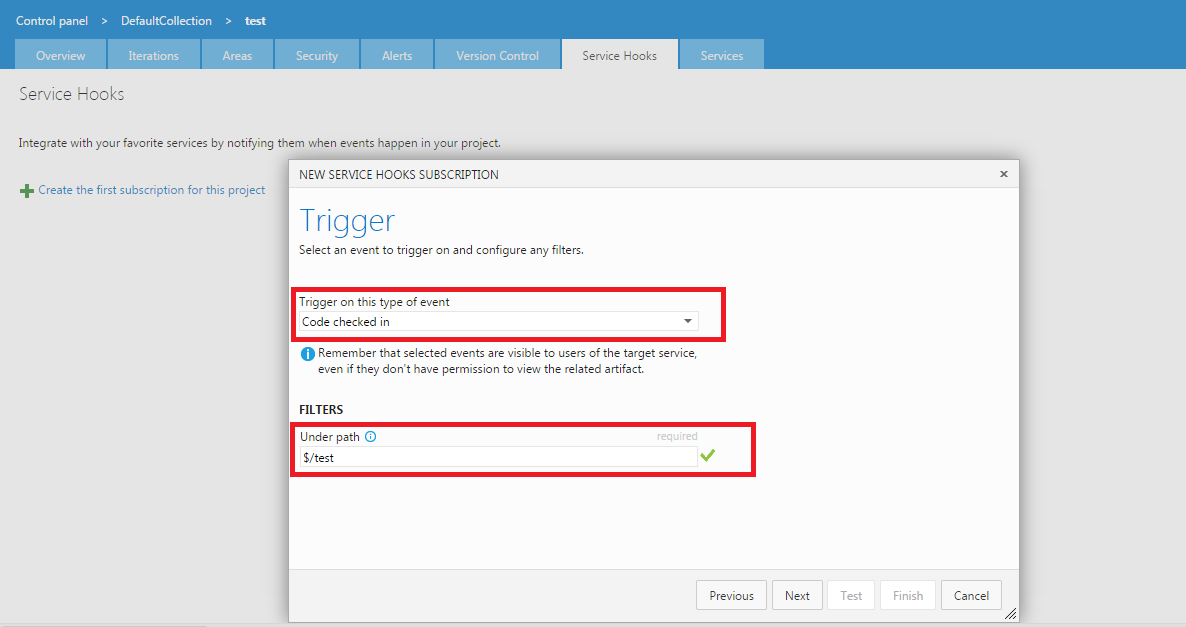
- Create new subscription and select web hook from service.
- Select appropriate trigger and path under filter, Press next.
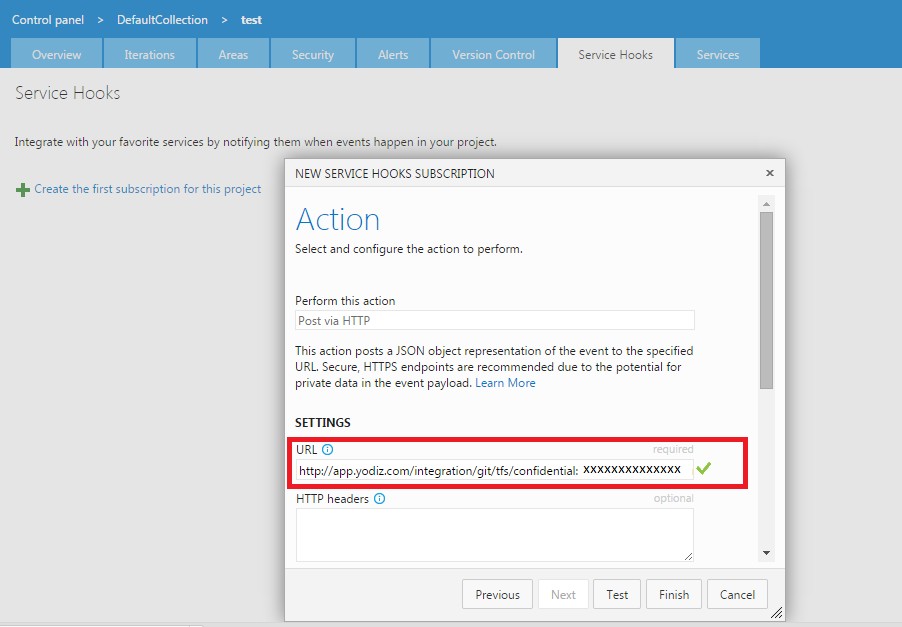
- Paste here the Yodiz URL that you copied at step 1 to "URL" text field.
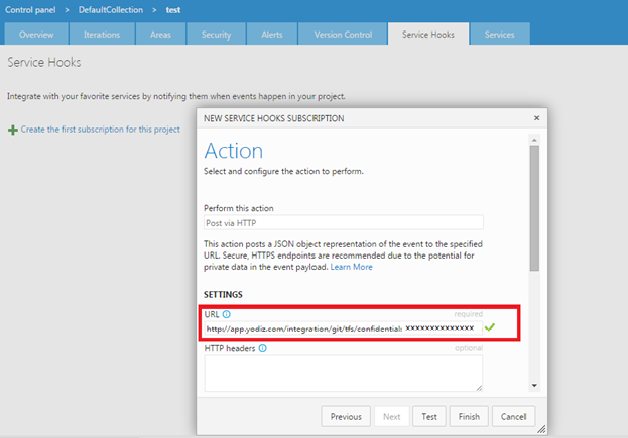
- That's it. You are done.
How to Integrate Mercurial with Yodiz
Yodiz supports integration wtih Mercurial repositories hosted locally or at any cloud service.
Integration Steps
- Login to Yodiz and click on 'SCM Integrations' from "more" navigation menu
- Select Mercurial
- Download "post-commit-hg" file to your local computer. Link is visible there at first step.
- Copy hook to your local machine.
Add hook path in hrc file located in Mercurial repository e.g repository/.hg/hrc, your path entry should look like
[hooks]
commit=sh "your local machine path"/post-commit-hg
Be sure you have installed bash and curl support in you system. - Note: For Microsoft window users please download Bash curl and add its path in your Environment Variables e.g c:\bash-curl\
- That's it, you are done.
How to Link commits to Tasks and Issues
In your commit message, add following notations to link commits to Tasks and Issues at Yodiz.
- For Tasks: use notation @T25
The commit message will be included in Task with ID 25. - To mark task done, use notation @T25:R
"R" will indicate that this task is completed and Yodiz system will update the task status automatically. - For Issues: use notation @B12
The commit message will be included in Issue with ID 12. - To mark Issue as "resolved", use notation @B12:R
"R" will indicate that this issue is resolved and Yodiz system will update the issue status automatically - If you face any issue, please Contact Support
How to use Post Commit Webhook for Yodiz
Integrations for Post Commit Webhook can be accessed through the SCM Integrations page.
Integration Steps
- Login to Yodiz
- On the top menu, press More.
- From this menu, select SCM Integration.
- On the next screen, from the left side menu, select Post Commit Webhook.
- Sample Json to be posted on above URL, you should put your own value against each Json keys.
{
"comments" : "your comments go here e.g @B1:R (will mark bug 1 status as resolved)",
"repuser" : "your code repository user name e.g Gabby",
"scmType" : "code repository type you are using e.g svn/git/tfs etc",
"revision" : "code revision e.g 3343",
"branch" : "code branch e.g main",
"log" : ["file1.txt modified","file2.txt added"]
}
How to Integrate Slack with Yodiz
Integrations for Slack webhook can be accessed through the SCM Integrations page.
Integration Steps
- Login to Yodiz
- On the top menu, press More.
- From this menu, select SCM Integration.
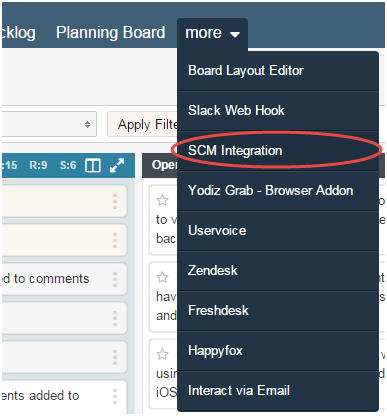
- On the next screen, from the left side menu, select Slack webhook.
- Press the Add new button.

- On the resulting screen you will be required to fill in a number of fields.

- First enter a Descriptive label. Use this label to provide extra context in your list of integrations.
- Then enter the Webhook URL. This can be acquired from your Slack Integration setup page.
- Then enter which Channel to use for incoming messages. Messages that are sent to the incoming webhook will be posted on this channel.
- Finally select the projects for which you want updates to be pushed to the Slack channel.
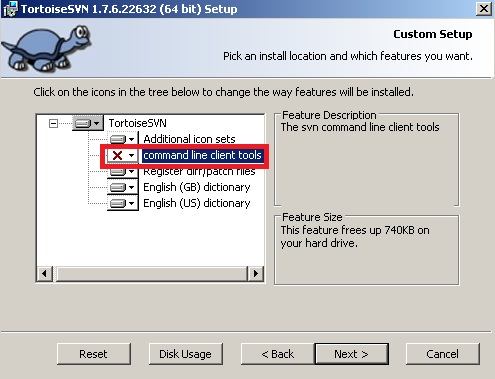
How to Integrate SVN with Yodiz
Yodiz supports WebHook integration with Assembla. It will enable you to:
Integration Steps
- Login to Yodiz
- On the top menu, press More.
- From this menu, select SCM Integration.
- On the next screen, from the left side menu, select Tortoise SVN.
- Download hook post-commit-svn.
- Download and install tortoise svn client (don't forget to install subversion client see screen below)
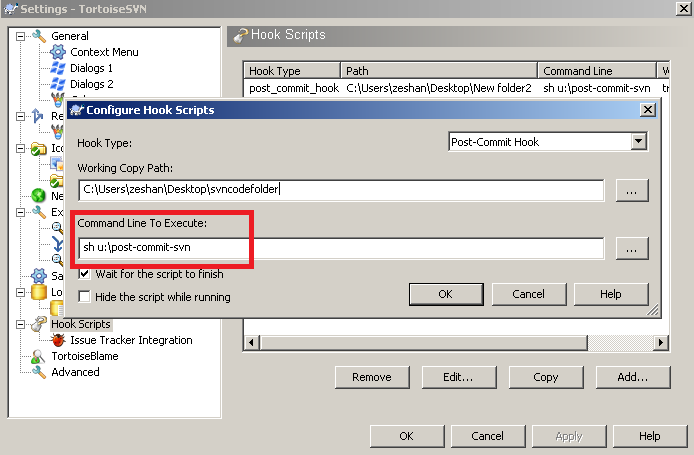
- Add sh before script as shown in screen below, Be sure you have installed bash and curl support in you system
- Copy hook to your local machine.
- Add hook path into Tortoise SVN client for detail see Client Side Hook Scripts
- Add sh before script as shown in screen below, Be sure you have installed bash and curl support in you system
- Note: For Microsoft window users please download Bash curl and add its path in your Environment Variables e.g c:\bash-curl\
- If you found post-commit script not working on your environment you can send commit log to yodiz directly using Post commit web hook
How to Link Commits to Yodiz
You can track your commits by associating them with bugs or tasks. This will help you identifying which files are added, updated or deleted against a particular bug or task. Moreover, you can also mark your task or bug resolved just by following a simple convention when writing your comments for commit.
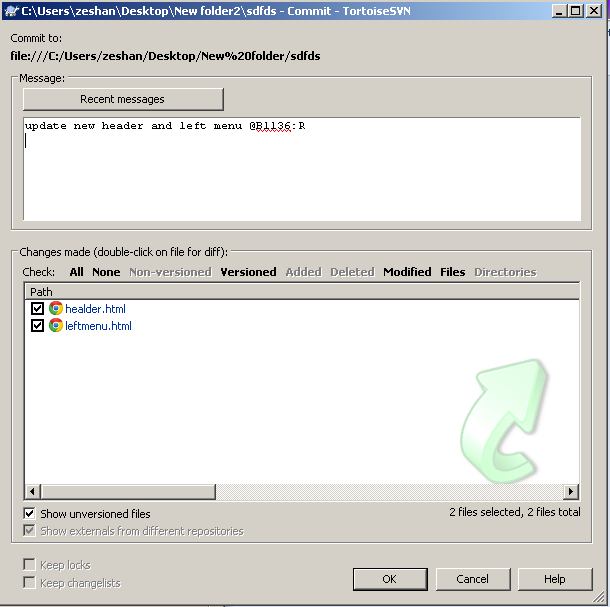
Tasks commit example
- In below screen shot a developer is committing a file with a commit message including '@T2:R' notation.
'@' sign represents existence of a notation.
'T' represents Task
'T2' Numeric value after 'T' is the task Id.
'R' Character after colon tells the system to mark the task 'done' on commit.
Note: You can skip ':R' characters from the notation if you do not want to mark the task done.
What you will see in Yodiz?
When you go to Task with ID 2, this is what you will get in the Task detail view after successful commit.
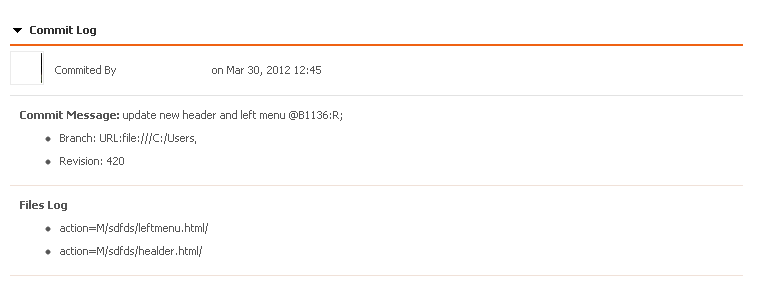
Issues commit example
In case of bugs just replace 'B' character with 'T' and rest remains same. For example to resolve Issue#25 including commit message with following notation
@B25:R
This is what you will see in your Yodiz Issue id 25
How to Integrate UserVoice with Yodiz
UserVoice i ntegration with Yodiz enables teams to view, plan and manage customer tickets with ease. You can convert UserVoice tickets and Ideas into Issues or User Stories.
Integration Steps
- Login at Yodiz
- Go to "More" from top navigation and select "UserVoice"
- Click on "Uservoice Setup" link from left menu
- You will be prompted with form to fill 3 fields that are required for configuring Yodiz integration with UserVoice.

- Sub domain: It is prefix of uservoice URL for your company, for example subdomain will be "yodiztest" for uservoice URL: https://yodiztest.uservoice.com
- Consumer Key & Consumer Secret: Follow these steps to get these values from UserVoice portal
- Login at your uservoice account
- Click on settings icon from top right corner
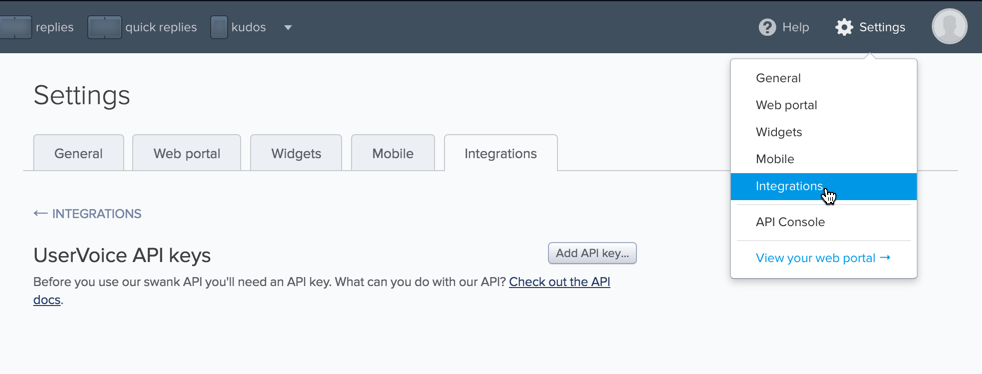
- Scroll the page and find "Channels" heading
- Click on "Uservoice API Keys"
- Click on Add "API Client" button
- Now fill the fields in pop-up. "Name" could be any, it's just for your own reference
- Application URL can point to "app.yodiz.com"
- Click on checkbox "Trusted" (Very important step)
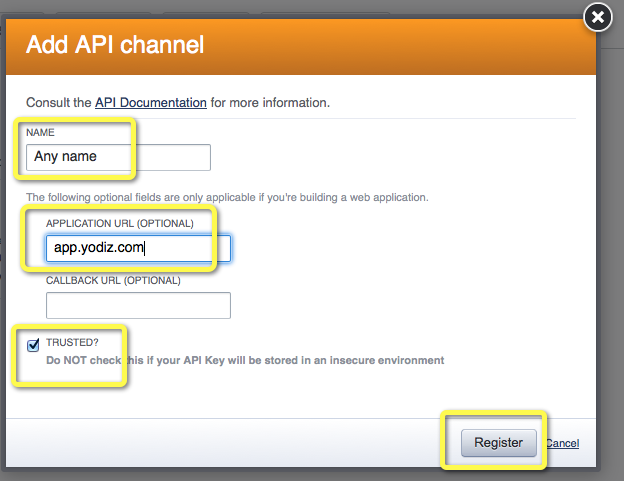
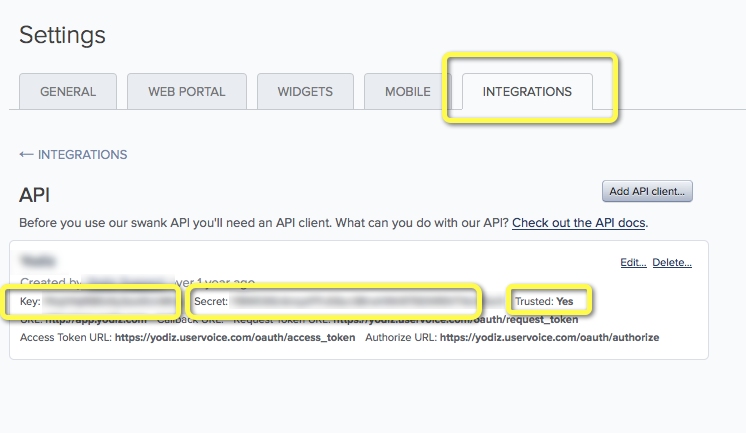
- Now you will see the API information, copy the "Key" and "Secret" and paste it at Yodiz
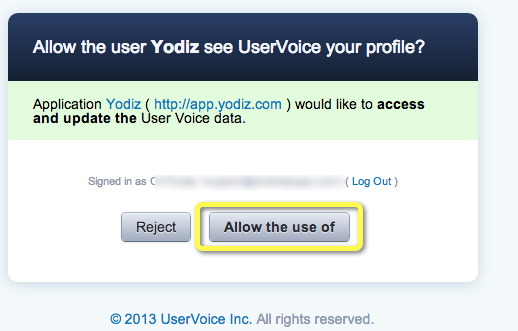
- Press SETUP NOW button at Yodiz, it will now take you to UserVoice authorization page, login there and press "Allow use of"
- You are done. If you face any issue, please Contact Support
How to Integrate Zendesk with Yodiz
Zendesk integration with Yodiz enables teams to view, plan and manage customer tickets with ease. You can convert Zendesk tickets into Issues or User Stories.
- Login at Yodiz
- Go to "More" from top navigation and select "Zendesk"
- You will be prompted with form to fill 3 fields that are required for configuring Yodiz integration with Zendesk
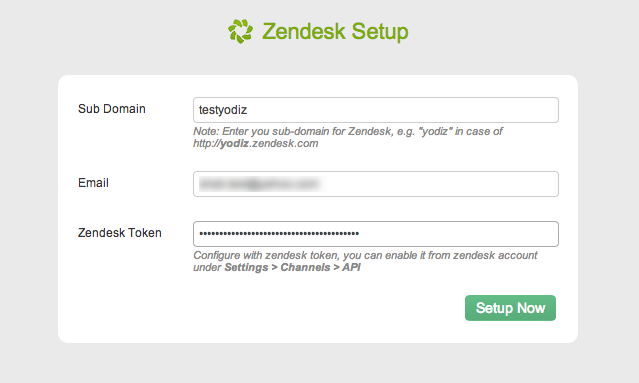
- Sub domain: It is prefix of Zendesk URL for your company, for example subdomain will be "yodiztest" for Zendesk URL: https://yodiztest.zendesk.com
- Email: Admin email address of your Zendesk account (Usually the account with you sign-up at Zendesk)
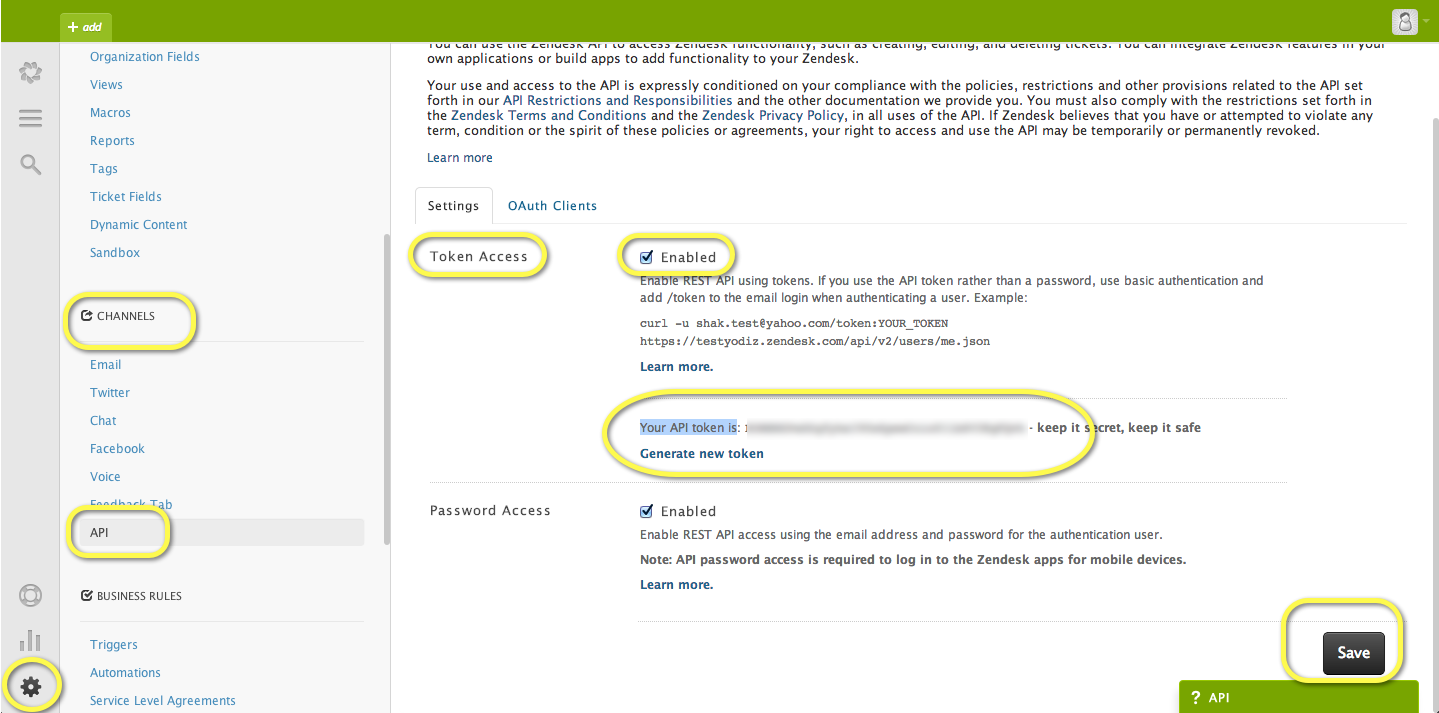
- Token:You need to get the token from Zendesk portal. Please follow these steps
- Login to Zendesk account
- From Left menu at Zendesk click on "Settings icon"
- Scroll the page and find "Channels" heading
- Click on "API"
- From settings click on Token Access checkbox "Enabled"
- Copy the Token
- IMPORTANT: Scroll down on the Zendesk page and press "SAVE" button. It seems that SAVE button is bit hidden under scroll and if you forget to press SAVE button the integration might not work, as the Token will become invalid
- You are done. If you face any issue, please Contact Support