Status Set is an assortment of custom statuses, which are used to track workflow of an item (Tasks, Issues, User Stories, Sprints, Releases and Epics). The Status Set screen allows you to create your own Status Sets, which can be used in any of your projects.
Statuses are divided into three categories:
- Todo
- In Progress
- Done
Using the Status Set screen, you can create statuses for all of these three categories and these statuses can then be used throughout Yodiz, depending upon the associated Project. Each Item can have a total of 25 statuses across three categories. Apart from creating new Status Sets, you also have the ability to Edit existing Status sets.
Default Status Set
Every account on Yodiz has a “Default Scheme” of status set for all Item types by default. For further details on Default Status Set, please follow this link: Default Status For Items
1. Add new Status to Default Scheme
New Statuses can be added to Default Scheme in Yodiz. There are two methods:
1.1 Via Status Set screen
1.2 Via Board Customization popup
1.1 Status Set screen
From header menu in app, go to:
Settings Icon > Administration > Configurations > Status Set > Default Scheme > Edit Scheme (Pencil Icon) > Edit Status Set popup.
Each item type has its own option to Add Status. For example, click on Add Status button in Issues tab. A mini pop-up will open asking to fill in essential details.
Add status here: Provide the Title of the Status.
Select Category: Select Category of the added Status.
Once the name of desired Status is filled and required category is selected, Click on the Add button and the status will be displayed under selected category. In this example, we have selected “In Progress” category.
Visual Guide 1.1
1.2 Via Board Customization popup
You can access Board Customization from Issue Tracker, Sprint, Epic and Release Board. We are using example of Issue Tracker board here. In order to Add Status via Board Customization, go to:
Right Navigation Panel > Settings > Customize Board Columns.
Once you click on the highlighted Customize Board Columns option, a popup will open giving you ability to Add Status under Unmapped Status section, on the go.
Provide the name of New Status and select the desired Category. Click on the Add button to save this Status.
Visual Guide 1.2
2. Remove/Delete new status
The unwanted status can be removed from the Status Set. Click on the Delete option given under menu (ellipses) icon on the right of every status.
Note:
· You need “Super Admin” rights in order to Delete a Status Set and individual Statuses in it.
· If you delete a Status from any category, you will be required to map it to a new Status before deleting the original Status.
Visual Guide 1.3
3. Rename a Status
Status title can be renamed.
Click on the Edit option given in menu icon (ellipses) on the right of every status. Make the required changes and click on Save.
Visual Guide 1.4
4. Impact of changing a Status on other Projects
If you make changes in one Status Set Scheme, all the projects associated with that Scheme will be impacted.
- If you delete a Status from any category, you will be required to map a new Status, before deleting the original Status. This newly mapped status will now replace the deleted status for all associated projects.
- Reports, charts and analytics that are based on Statuses will also be impacted.
Impact of changing Status Set Scheme on the Board Configuration
Since Board Configurations are totally dependent on the Status Set as a base point, changing project status set means that all the previous statuses you had, move into the Unmapped column. You will need to map panels for those statuses again.
5. How to Create a New Status Set
There are three main ways of creating a Status Set:
5.1) Import from Existing Scheme
5.2) Import from CSV file
5.3) Create a Status Set from scratch
5.1. Import from Existing Scheme
On Status Set Screen, click on Create Status Set button. A popup will open where you can add the New Status Set. In order to import an existing scheme, click on the highlighted Import dropdown and select “Import from Existing Project”.
Select Scheme from dropdown and click Import.
While selecting scheme, you can choose Default Scheme option in order to duplicate the default scheme and rename accordingly. You can then add, edit and delete the statuses to your own liking.
Note: You can make changes (edit, delete and rename statuses) in the Custom Status Scheme after importing it from other Existing Schemes.
Visual Guide 1.5
5.2. Import from CSV file
Yodiz offers creating a Status Set using CSV file. In order to import the CSV file, click on “Import from CSV file” option.
After clicking on Import from CSV file option, a mini popup will appear asking to Upload the CSV file.
Once the CSV file is uploaded according to the Status Set Template, enter the Title of Status Set and make desired changes to it on the go (if any). Click on Save & Close.
Note: Use our Status Set Template to ensure proper CSV data format. Do not change header in provided CSV file.
Visual Guide 1.6
5.3) Create a Status Set from scratch by entering its details
- Enter a Title for the Scheme.
- Enter a Description for the Scheme.
- The Add Status button is used to add a new status. You can add statuses for Issues, User Stories, Tasks, Releases, Sprints or Epics by pressing the Add Status button corresponding to the item. Once you press the button, you will be required to give a status label and choose the category in which to place the status. Press the Add button to add the status.
Once you have added all the statuses, press Save & Close button from top right corner.
Visual Guide 1.7
Note: Status Set Scheme of API imported projects are migrated as it is except in case of Axosoft (Mapping customization is provided in case of Axosoft).
6. Associate Status Set to a Project
Status Set can be associated to a project via two methods.
6.1) Associate upon Project Creation
6.2) Switch Status Set Scheme in Project Settings
6.1) Associate upon Project Creation
Status Set can be associated to a project while creating it. You are required to select a Status Scheme in Step 4 while creating a Project.
You can click on the “View Scheme” to preview associated scheme and make changes (add, delete, rename) in the Status Set Scheme on the go. However, View Scheme option would only be visible to “Super Admin”.

Visual Guide 1.8
6.2 Switch Status Set Scheme in Project Settings
Status Set can be switched in project settings too. Follow the guidelines below.
Go to list of your projects. Click on the settings of project.
Project settings will be opened; click on the Manage Status Set Scheme tab. Status Set Scheme associated to the selected project will be shown. You can view the currently associated Status Set Scheme under Manage Status Set Scheme Tab. Click on Switch Status Set in order to change Status Set from the current Scheme to your desired one.
A pop-up will open asking you to select the status set scheme you want to associate to the current project from the dropdown list of other available Schemes.
Select the scheme from drop down and click on Associate button. Next step requires mapping which is explained in next step.
Visual Guide 1.9
6.2.1 Map Status Set
In this step, you have to map status sets.
Note: Statuses from “Source Status Set” can only be mapped against same category status in “Desired Status Set”.
Click on Done and you will be shown a confirmation popup screen.
Click on Start Process to work with the new Status Set Scheme.
Items will then be updated according to your selected customized mapping.
Once the Status Set is updated, user is notified about the success of switching status set scheme process along with the details of updating.
Note: While Status Set switching is in progress, all other users associated to the current project will be unable to make any changes to data. User is hindered from any interaction on screen in order to avoid any data inconsistency. Users are also notified about it in form of an obtrusive warning message.
Visual Guide 1.10
Board Layout Editor
1. Relation of status set to Board layout
Board Layout can be customized in accordance with Status Set on Issue Tracker, Release, Kanban and Scrum Board. In order to access Board Layout Editor.
Go to Right Navigation Panel > Settings > Customize Board Columns.
Customize Board Columns is same popup as Board Layout Editor. This popup allows further customization on top of Status Set and allows user to freely drag and drop statuses in different Panels irrespective of their category.
Visual Guide 1.11
2. Unmapped column
Every newly created status is added into the Unmapped panel/column. Unmapped column Only appears on the Board when you have not set a particular status under any panel in board Layout Editor.
The Unmapped column contains a list of Statuses, which are not mapped in any column. Clicking on the Unmapped column will open a list of all the unmapped statuses.
Visual Guide 1.12
3. Set color to widget
You can change colors of the widget via Customize Board Columns. Once you choose the color you desire, click on Save and the chosen color will be assigned to that Status.
Visual Guide 1.13
FAQS (Frequently Asked Questions)
Can I change category of existing status?
Can I change category of existing status?
No, category of existing Status is restricted and can’t be changed.
How can I change status set for only one project?
It can be done in project level settings. Refer to heading 6.2 Switch Status Set Scheme in Project Settings in order to learn more about it.
What are the default statuses in default scheme for items?
Refer to this article in order to find out about the default statuses for each Item type.
Why do we restrict status mapping for deletion, to same category statuses?
Status can be deleted but you have to provide mapping before deleting it. Basically, status mapping is restricted in to same category in order to avoid data inconsistency and data loss. If there were no other statuses available in the same category, then you would not be able to delete the status. There must be at least one Status in each category of Status Set.
Why delete option of Status Set Scheme is disabled?
Status Set Scheme cannot be deleted if any project is associated with it.
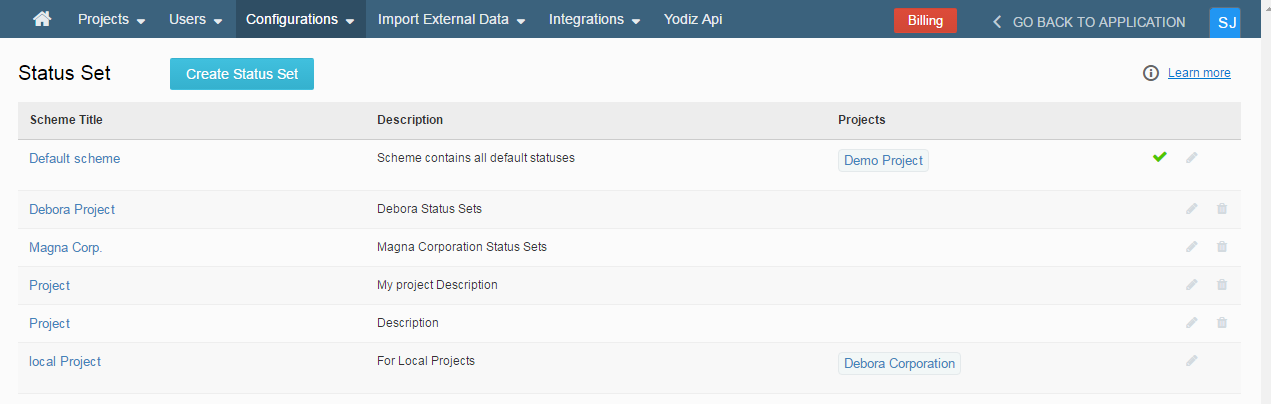
In above screenshot, only the schemes with no associated projects have the “Delete” icon enabled.
Note: You need “Super Admin” rights in order to delete a Status Set.