The Project Roadmap provides a clear vision and direction to your team with a comprehensive overview of the project schedule, your milestones, and achievements. It gives a complete picture of planned milestone in form of Releases, Sprints, Epics as Features of a project, helping you visualize dependencies on a timeline.
Use Roadmap to:
- Use one central place to plan and schedule across multiple projects. A single view of a complete program schedule helps teams using SAFe, Nexus or other scaling agile methodologies envision a complete strategy. This also helps teams working for the composite program, where delivery of one Project is dependent on others.
- Visualize your Project milestones by breaking them down into Sprints, Releases or Epics.
- Save time and eliminate silos with Project status updates that are readily accessible through Roadmap.
- Monitor team progress to determine whether it will meet its planned target or whether there are obstacles in the way.
Working with Roadmap
To access your Projects Roadmap:
- Select the Project(s) from the top left corner of the Project drop-down
- Click on the list of Sprints, Releases, and Epics of the selected Project(s) on the left navigation bar
- Gantt Chart timeline will highlight the selected items with their start/end dates

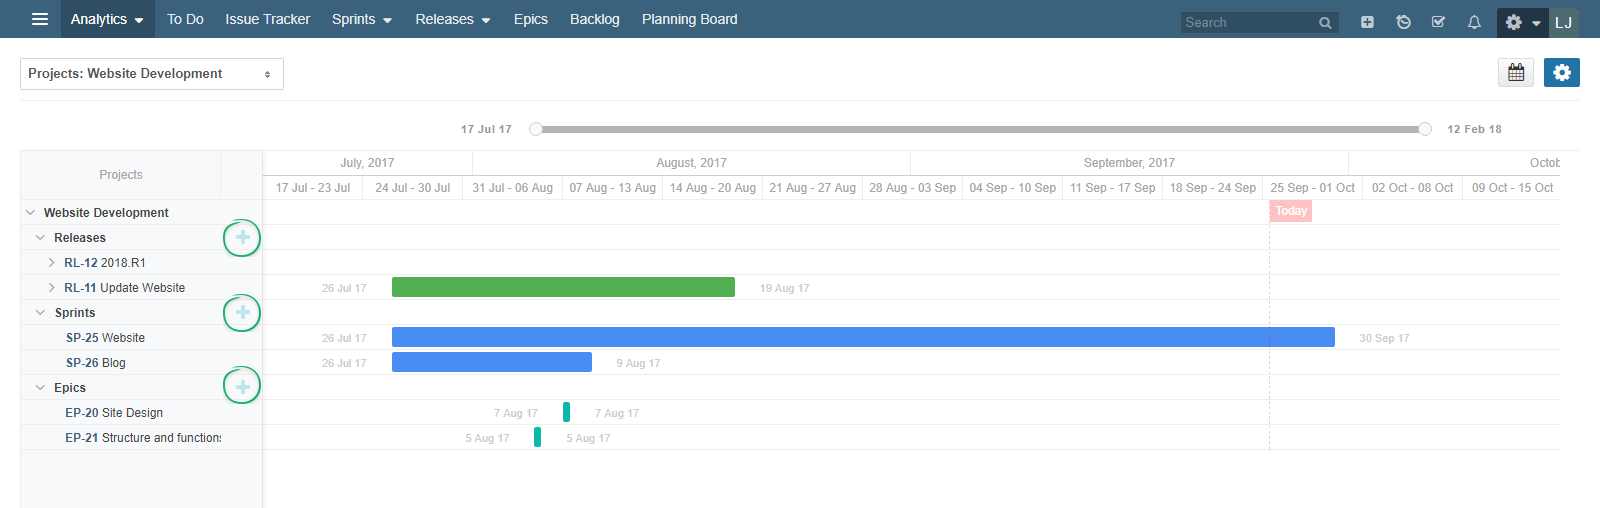
Project Roadmap showing sprints, and releases
1. View Epic, Sprint and Release Items list
You can see contents of the Epic, Sprint or Release from the right navigation panel.
- Select Sprint or Release from the left navigation panel of Project Roadmap
- Double click on the relevant Epic, Sprint or Release row on the Gantt chart
- The right navigation panel appears containing two tabs:
- Analytics: It shows the related analytics of the currently selected Epic, Sprint or Release.
- Associated Items: It shows the associated items along with their respective Title, Status and Responsible of selected Sprint, Release or Epic.
2. Plan Program Increments, Features, and Epics
To schedule features use Project Level Epics and to plan program increments for complex projects use Yodiz Global Epics. You can view and plan Epic schedules on the Gantt Chart by clicking the Settings ![]() icon on the top right corner and checking the boxes under Epics View.
icon on the top right corner and checking the boxes under Epics View.
Customise Project Roadmap view, with available Settings
By double clicking on the Epic bar on the timeline it will show Analytics summary of selected epic. To look at the status of associated items, click on Associated Items section.
Yodiz Tip: Use Tags to distinguish between Business Epic and Enabler Epics.
3. Create Epic, Sprint, and Release
You can add Epics, Sprints, and Releases from the left-hand column. To add Epics on the timeline, enable “View Epic” option in Project Roadmap settings first. Click on the highlighted icon in the following screenshot:
To create a milestone, mention title, start and end date and click on Create
Yodiz Tip: Manage your team’s available time using Sprint Resource Manager.
4. Associate Sprints with a Release
A Release can be made up of multiple Sprints. The association between Releases and Sprints will automatically fill the Sprint Items Release field.
There are two methods to associate Sprints with Releases on the Project Roadmap:
- Via Release Analytics
- Via Project Gantt Chart Timeline
Note: Association of a release with Sprints does not have an impact on Dependencies.
4.1 Via Release Analytics
To view associated Sprints with a Release:
- Locate the Release on the Gantt chart
- Double click on the desired Release bar of the chart
- The right navigation panel will appear showing Release analytics
- Click on Associate Sprints button in the right navigation panel and select the Sprints you need to link to the Release
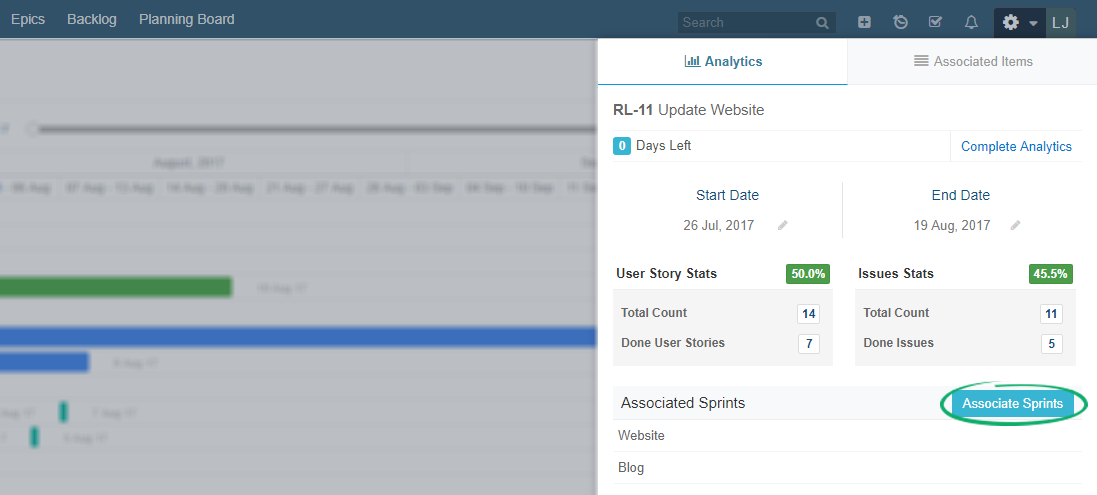
Associate Sprints from Project Roadmap
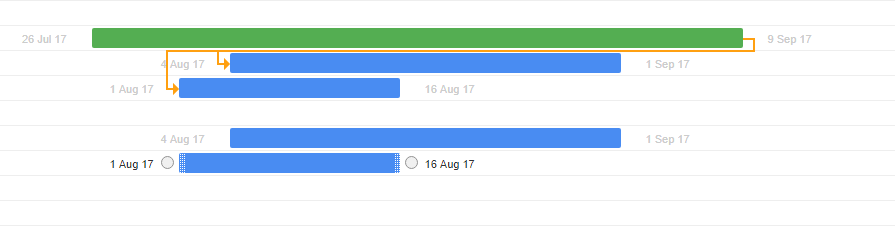
4.2 Via Project Gantt Chart Timeline
The Project timeline can also be used to instantly associate Sprints with Releases:
- Locate the Release and the desired Sprint on the Gantt chart timeline
- Drag one end of the Release bar and join it with the desired Sprint node. You can also associate multiple Sprints with this method.
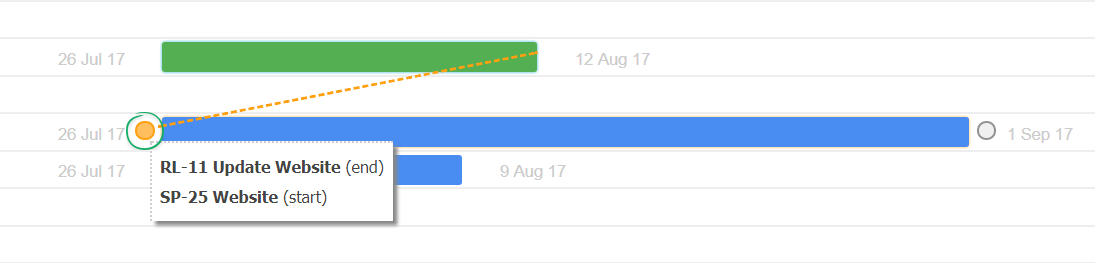
Associate a Release with Sprint
Note: This association does not impact the Sprint or Release dependencies. To know more about the association, open the Release board, select a Release and click on Sprint option of Right Navigation panel. It shows a summary of all associated sprints of the release.
5. Change Start/End Date
You can modify the Start or End date of a Sprint, Release, and Epic by dragging the bar edges on the timeline.
Change start and end date of scheduled milestone
6. Change Roadmap Timeline Range
To set the roadmap date range, click on the Calendar ![]() icon on the top right. You can also adjust the view of your timeline by setting the Zoom level.
icon on the top right. You can also adjust the view of your timeline by setting the Zoom level.
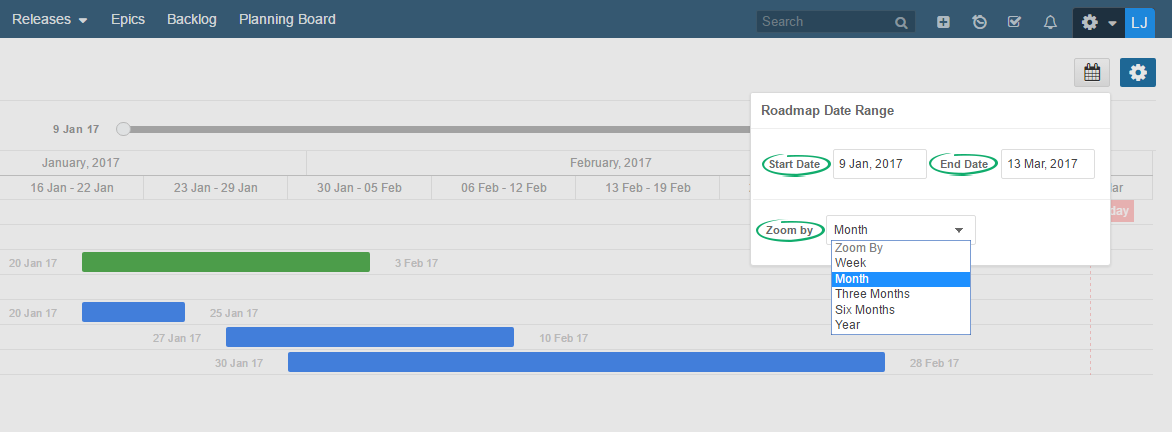
Define Roadmap Timeline Date Range
For quick zooming, you can simply adjust your timeline by dragging the timeline on the top bar.
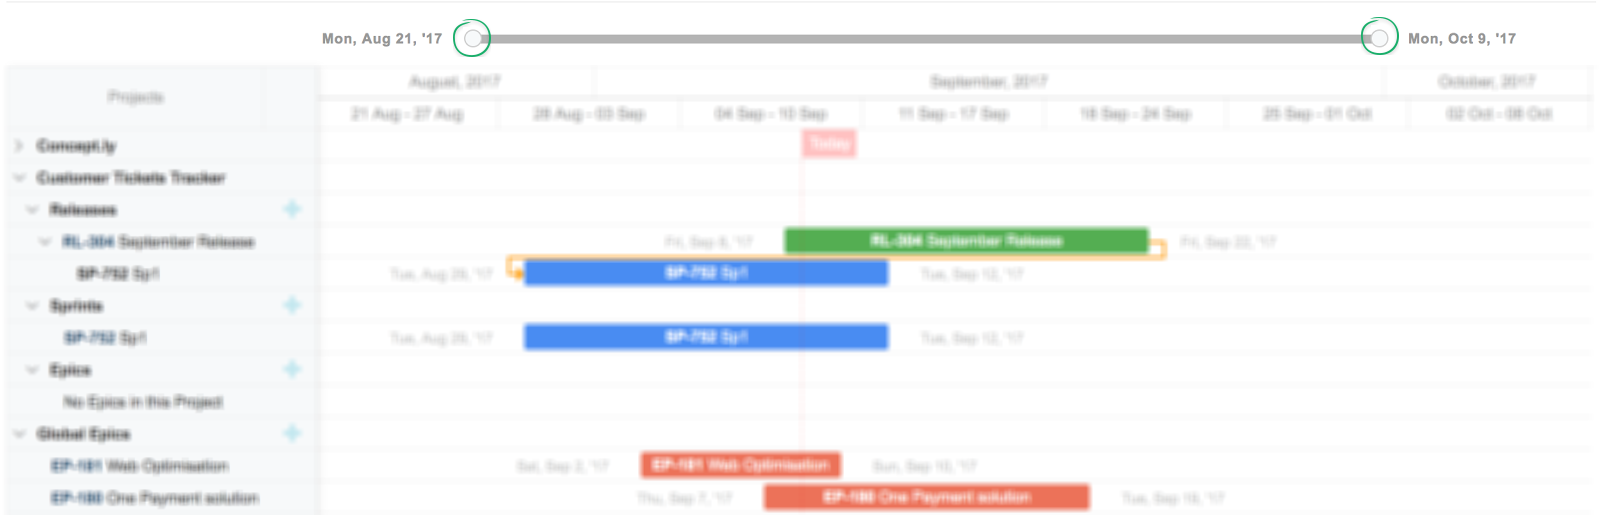
Zoom your Roadmap Timeline
Note: Clicking on an option from the left panel will show its corresponding time slot on gantt chart. Double clicking on gantt chart row gives you an option to modify its start and end date.
7. Customize Project Contents List
You can add more columns for a personalized view of Project milestones at left panel. Customization is also provided on the content level (Sprint, Release, and Epic). For instance, you can see all Sprints and Releases in a project, or you can just choose to view the ones that are active and upcoming. Additionally, epics built-in filters help to sort items differently. These selection criteria can be found under the settings.
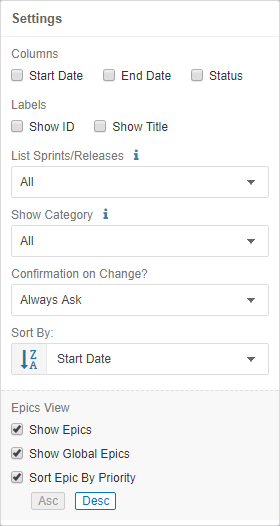
Edit Settings to filter information on Roadmap
7.1 Settings explained
- Columns: You can add or remove Start Date, End Date and Status columns to see relative information of listed milestones.
- Labels: Check the boxes for “Show ID” and “Show Title” to display the milestone ID and title on the timeline bar.
- List Sprint/Releases: You can choose to display “All” Sprints and Releases that exist in a Project, or you can choose to display only those are “Active and Upcoming”.
- Show Category: You can select to view milestones according to their status by choosing among “All, To Do, In Progress and Done”.
- Confirmation on Change: Choose whether you want to receive a confirmation message for changes made on the Project Roadmap. Confirmation message appears on start/end date or association changes of Sprint or Release.
- Sort By: You can choose to sort by Start (default) or End date.
- Epics View: Use this section to display Epics on the Project Roadmap. You can choose to plan Project and Global Epics.
“Sort by Priority” is an additional sorting option that is applicable to Epics only. It sorts epics according to their Priority set at Epic Board. If it is not selected then epics are also sorted by Start or End date criteria mentioned under “Sort By”.